
Laravel is a PHP framework created by Taylor Otwell. Currently, it is one of the most famous PHP frameworks that exist and also is one of the most used because of its simplicity, but this doesn’t mean that isn’t a complete framework, just the opposite. It has a lot of features that make more and more people support the project.
The community behind it is huge, they contribute to the core and with many packages (in some days I will explain about this) that help us to save time in common tasks in almost every project.
Some features it has:
- Own template engine, Blade
- Own ORM, Eloquent
- Routes
- Packages
- MVC
- And many more
Installation
Before starting, we need to have installed PHP, MySQL and Composer.
Windows
Install Apache, PHP, MySQL and PHPMyAdmin
First of all, we need to install our local test environment with Apache, PHP, MySQL and PHPMyAdmin. I always use XAMPP. You need to download the file and install it like any other software for Windows. Next, next… Be careful with the web server route, you will need to select it. Normally, it is at C:\xampp\htdocs, but you can select another.
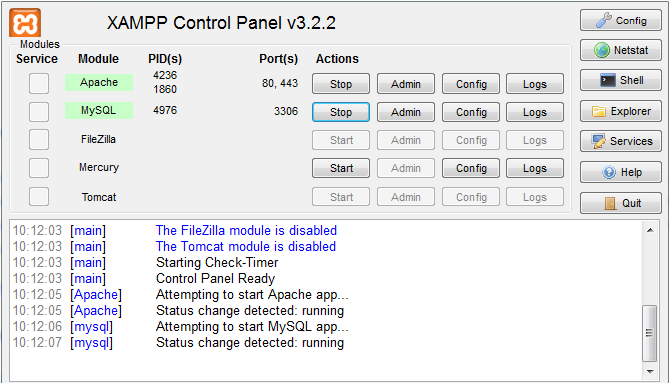
Execute XAMPP and turn Apache and MySQL on.
Now we have our web server and database running.
Install Composer
Composer is the PHP dependency manager. From which we can download Laravel and all its dependencies easily. To install it, it’s the same as XAMPP, download it and follow the steps. When finish we can access from the command line.
Linux
Install Apache, PHP, MySQL and PHPMyAdmin
To install the test environment on Linux you also can do it with XAMPP. Or you can do it manually, with the command line installing one by one, here there is an article where explain how to do it.
The web server route will be /var/www .
Install Composer
To install it on Linux you must execute these commands, one by one:
|
1 2 |
curl -sS https://getcomposer.org/installer | php mv composer.phar /usr/local/bin/composer |
With this you can access to Composer from your command line.
Create the first project
Once we have installed everything, we will have to download Laravel from Composer. Open the command line and go to the route of your web server. In my case will be:
|
1 |
cd C:/xampp/htdocs |
Once on the correct route you will have to execute the next command, changing with your name project.
|
1 |
composer create-project --prefer-dist laravel/laravel |
This will take some minutes because it has to download Laravel and all its dependencies. When finished, we already have Laravel installed on our server to start to develop anything.
Finally, to access from your web browser, you will have to access to localhost/public or also you can run the Laravel develop server and access from http://localhost:8000 .
|
1 |
php artisan serve |
Once we get this done, we will have everything to start to learn or start any project with Laravel.
-
– Documentación Laravel: https://laravel.com/docs/5.4